How to retrofit/install cruise control on a VW New Beetle (1998 on)
This is meant as a guide only, I am not responsible for any damage you cause to your vehicle.
Only for Petrol Engine Codes; APF, AQN, AQP, AUE, AVU, BDE, BEH, BFH, BML, and 1.9 TDi Diesel Engine, with Electronic Throttle Control (ETC)
Other engines require extra wiring harness not covered here.
(Engine code info source; VW manual 1J0 012 175 A)
Parts required...
Indicator Stalk part# 1J0 959 513 01 C
Wiring Harness part# 1J0 971 425 A
Available on ebay, as a kit, or buy the parts from your local VAG dealer
Tools required...
Torx 20 and 25
Philips #1 and #2 screwdrivers
Small flat blade screwdriver (80mm shaft)
Small paper clip
Torch or lamp
M12 spline socket
10mm socket
Short and long extensions and ratchet
Tub for the screws
Torque bar (60lbft)
Insulating tape or small cable ties
Stage 1 - Battery
Disconnect the EARTH lead to the battery.
Stage 2 - Under dash wiring harness
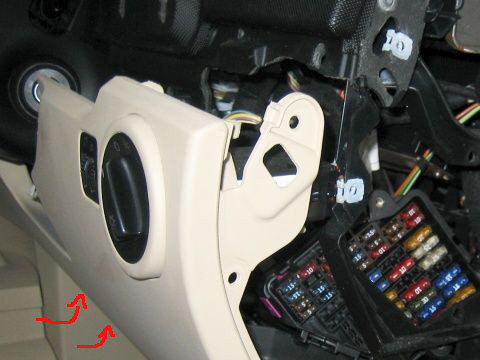
Remove the dash side panel , near the driver's door, and front panel (beige colour in this case).
Side panel
just pops off using a screwdriver, no screws. Remove the 2 screws, behind side panel, securing the front panel.
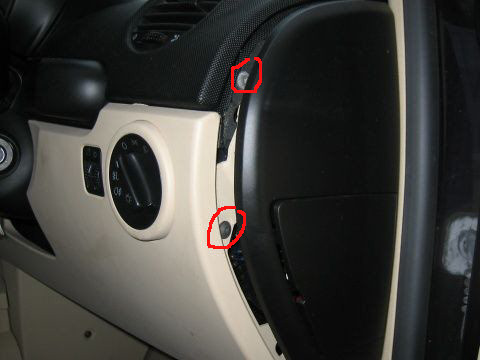
Take the end caps off the seat heater controls (blanks on cars without heated seats) and remove the 2 screws behind.
remove the 2 screws from underneath
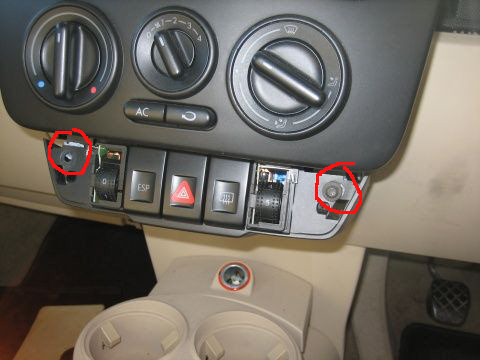
pop the circular cap off and remove the panel screw below.
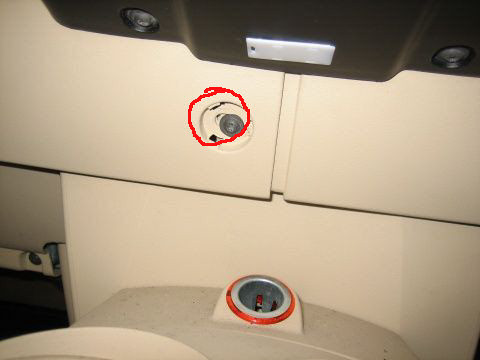
Pull the switch panel forward and remove the final screw on the right
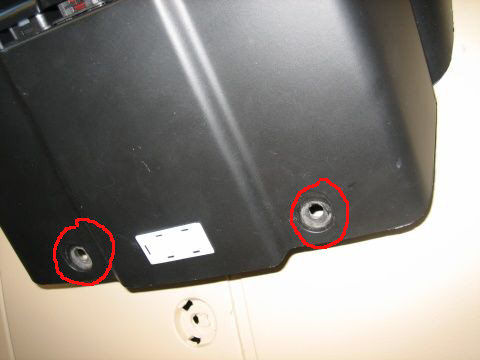
Next remove the 4 screws underneath, in the foot well, and unplug the light switch and fader wires.
You can then remove the front dash panel by pulling the right end towards the driver's seat then sliding the whole thing towards the drivers door. If in doubt it's easier if you remove the whole centre dash and radio but is possible without.
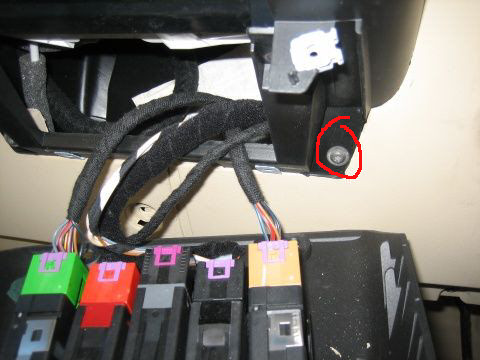
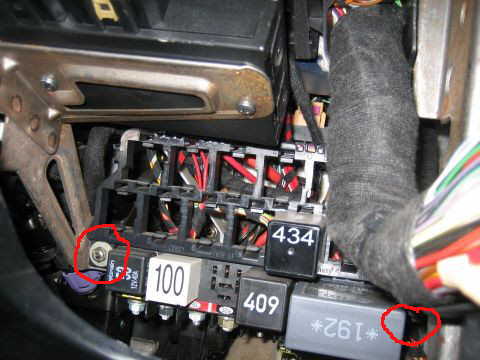
The relay rack needs to be removed, to access the T10e socket from underneath, it's held in by 2 x 10mm nuts, 1st next to [53] and to access the 2nd it's easier to remove relay [192].
The rack is in 2 parts and can be pulled forward, and to the left, out of the way.
To get better access to the rear of the fuse box, remove the 2 screws and pull it through the hole towards the driver's door.
Remove the 7.5amp fuse located where you can see the paperclip.
To unlock the blue/black wire that connects to the back of this fuse, use a small paperclip, unfold it into a U shape and push the ends into the holes either side of the fuse holder.
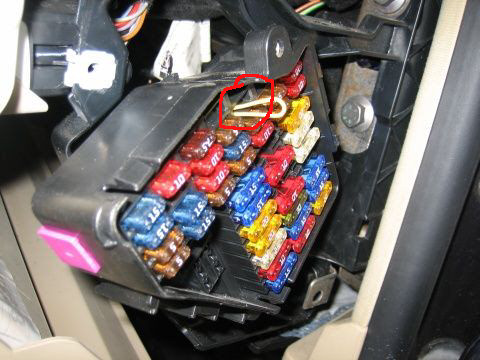
From the back of the fuse panel push the blue/black wire into its holder whilst pushing the paperclip in from the other side, then gently pull the wire from the back of the fuse box.
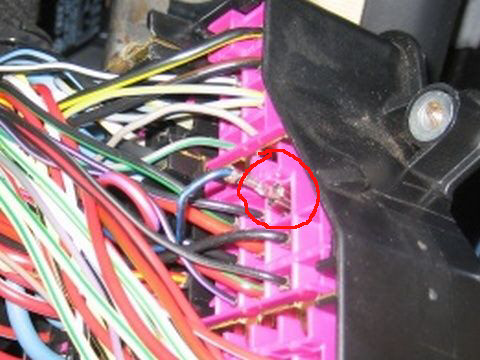
Plug the blue/black wire from the new Cruise Control harness into the back of the fuse panel where the original wire was removed, then the original wire from the fuse panel into the new Cruise Control harness.
To make more room pull any unplugged wires out through the hole above the fuse box.
You may also want to unplug the VagCOM and spoiler control (V5 and 1.8T).
WARNING: be very carefull not to close the drivers door whilst these wires/connectors are exposed.
Stage 3 - Upper dash wiring harness
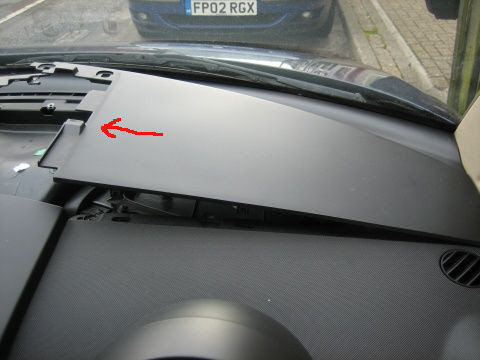
Remove the top centre dash cover, it just slides forward, easier if you wear a pair of rubber gloves.
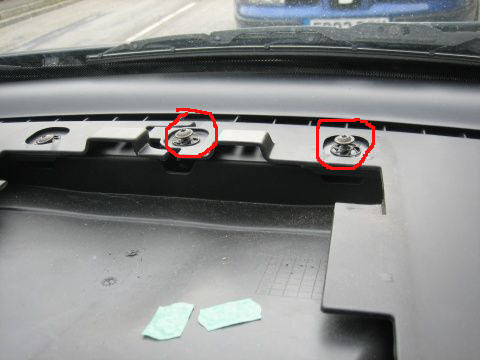
Now for the top right dash cover, there are 3 screws under the centre cover, near the windscreen, remove the centre and right hand screw.
The right dash cover will lift out with a bit of persuasion.
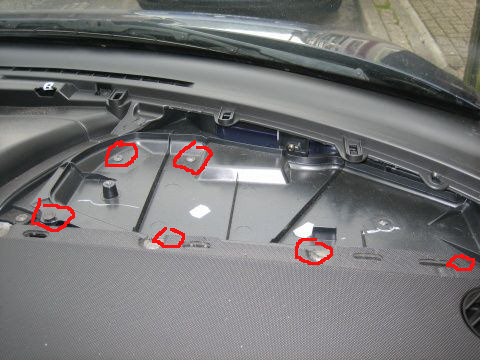
Underneath there’s another cover held in by 6 screws, 4 along the front edge of the pimpled dash and 2 to the left nearer the windscreen. This also requires a little coaxing to lift out.
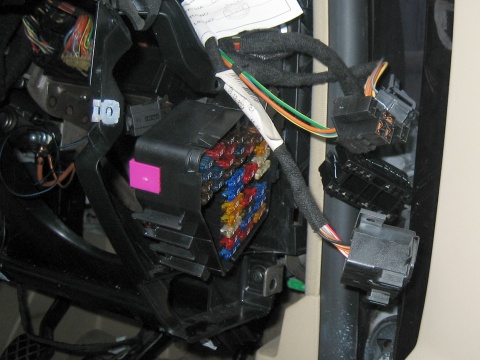
Now you can see the top of the junction box held down by 2 x 10mm nuts.
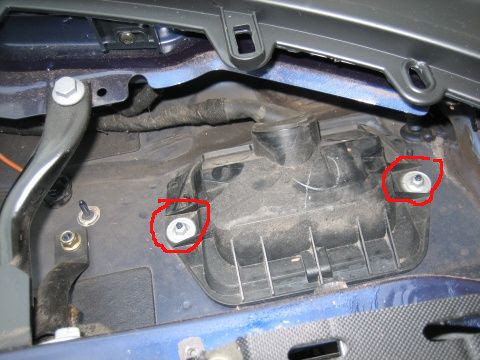
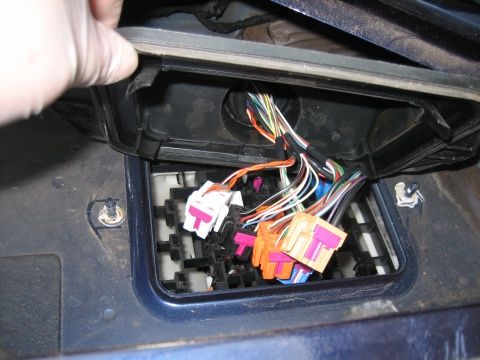
Remove the nuts and lift the top up to reveal the colour coded connectors. I found it easier to unplug them all and move everything over to the left, out of the way.
Next release the Black T10e socket from the rack, 1 clip either side, and push it through so it’s accessible from under the dash.
From inside the car you can feed the T10e socket through to gain reasonable access under the dash, it's just too short to reach all the way and you may need a lamp/torch to see the numbers on the socket.
Sorry forgot to take pictures for this stage.
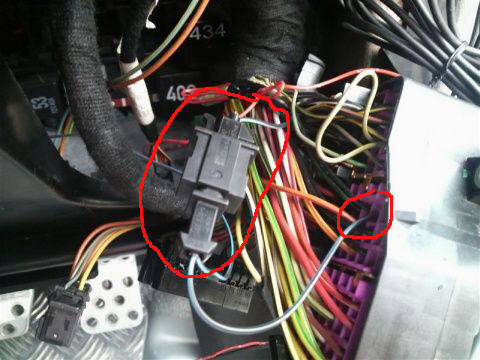
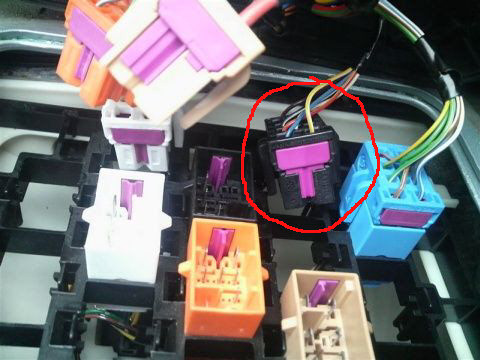
With the socket pulled through as far as possible, before inserting the wires from the new harness you need to release the purple locking bar on the socket. You can see one on the blue plug above. It only needs to be moved 1 or 2mm using a small screwdriver to prize it out on the end with the horizontal purple bar, not the purple T. The wires from the kit go into the corresponding numbered holes, 1, 2, 3 and 9.
1, 2, 3 and 4 are in a row, 4 already being used by a red wire (on my car), and 9 is above 2. Wire #1 has a larger pin than the others and will only go into hole 1 or 8. Once you’ve inserted all the wires fully, push the purple lock bar back in to secure them. Check they're secure before putting the socket back in the rack.
Put the socket back into the rack, insert all the colour coded plugs.
Rebuild the top dash.
Stage 4 - Steering column
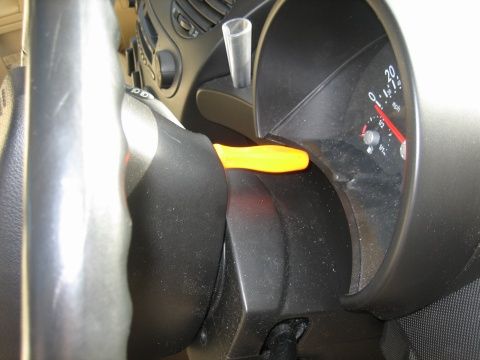
To remove the airbag you need a small, flat head, screwdriver with an approx 80mm shaft.
Turn the steering wheel through 90 degrees from centre. You can then access a small hole in the back of the steering wheel to reach the locking clip. Whilst inserting the screwdriver point it up, with the blade flat, until you feel it reach the catch, then raise the handle to release the catch and gently pull the top of the airbag forward. Turn the steering wheel through 180 degree and follow the same steps.
Unplug the airbag, yellow plug and 2 earthing wires, and put it to one side.
To remove the steering wheel you'll need an M12 Spline socket. I borrowed one from my local garage (thanks to Craig @ Llantrisant Garage).
Next remove the steering column shroud, 2 short screws to the front, 2 long screws underneath and a larger head screw beyond the column adjustment arm handle.
Lift the top shroud up and out.

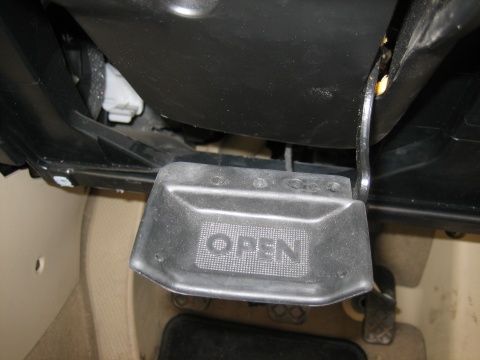
To remove the bottom shroud you need to push the adjustment locking arm down and remove the handle, 2 screws, then prize the bottom shroud lose from the left hand slide and out to the right over the ignition.
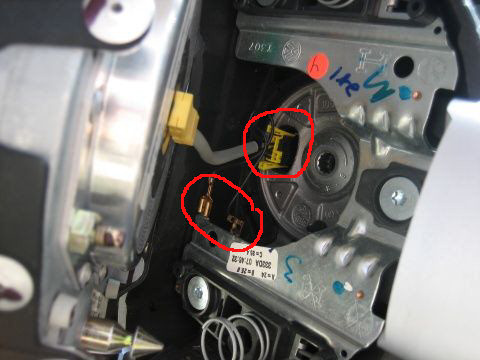
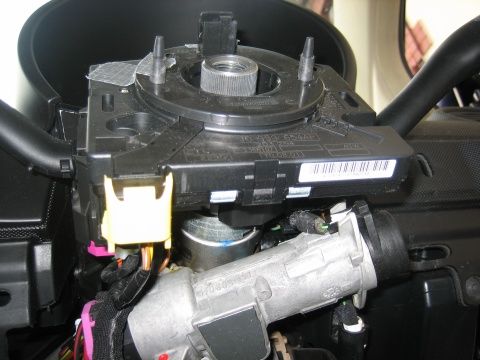
Next detatch the front box from the column stalks, 2 clips at the top (not shown as this is a bottom view), tape the circular section to the box to hold it in place.
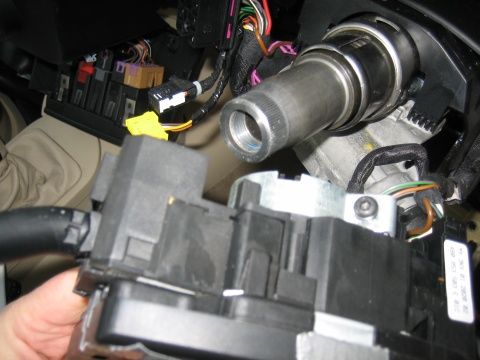
Slacken the locking screw (25 torx) and pull the column stalks forward to gain better access to the wiring, unplug all the wires.
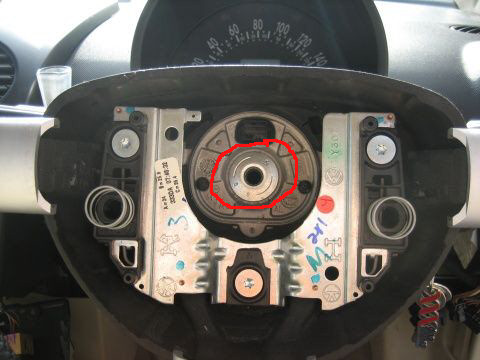
Slide the column stalks off the steering column.
At this point you can feed the wiring for the Cruise Control through from under the dash to the left side of the steering column. Make sure there's enough length to plug into the socket on top of the Stalk. Tape or zip tie the new wires to the existing harness.
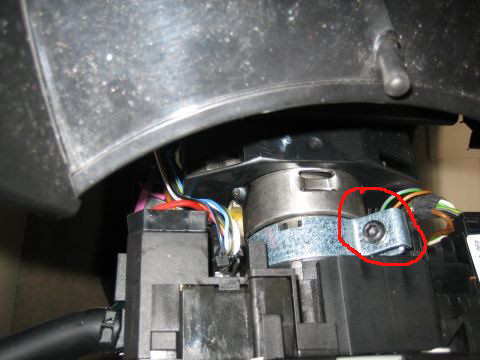
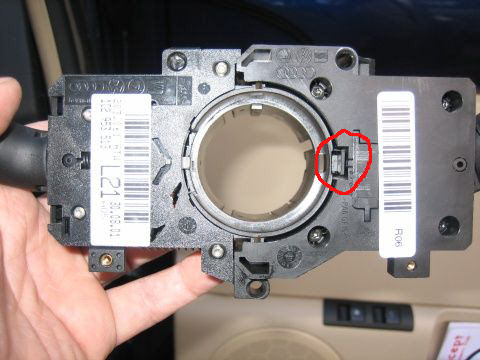
To split the stalks there's 1 clip to the right of the circle, they'll then just slide apart, left side forward. Replace the old indicator stalk with the new one.
Rebuild the steering column and front dash.
Replace the 7.5amp fuse.
Connect the battery.
Stage 5 - Enabling Cruise Control
To activate Cruise Control you'll need VagCOM and the lead to connect to your car.
Borrow from a Club member, buy one on Ebay (£15 ish) or you could take it to a VAG dealer.
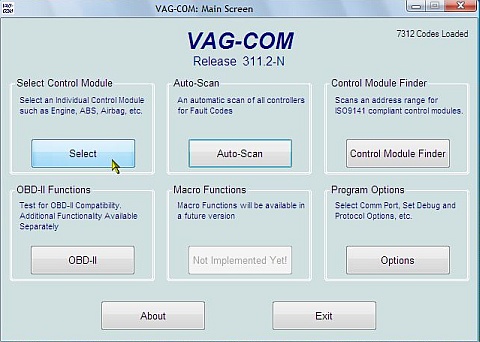
If using VagCOM, start up as normal (plug into pc/car, turn on ignition, start program, click - options, test port, apply), click on Select.
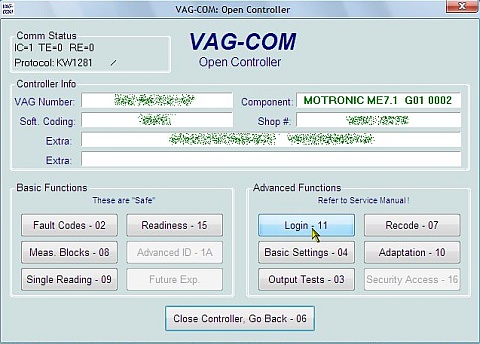
Click on 01-Engine

Click Login-11
Enter Login Code 11463 and click "Do It!".
Go back to the first VagCOM screen, click Select then Engine, in the Component window there should now be a G in the code, as shown below, "01" becomes "G01".
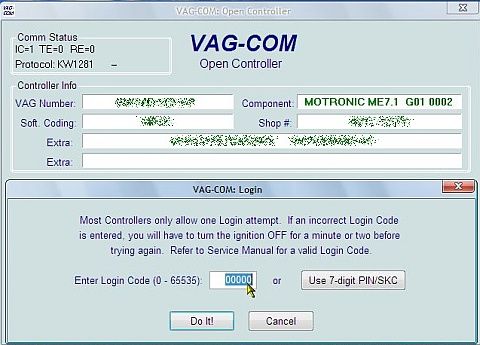
If you ever need/want to deactivate Cruise Control follow the VagCOM instructions above entering the login code 16167
That's it, assuming all went well, you now have Cruise Control.